
Mitsubishi Outlander: Steering wheel audio remote controlswitches
The remote control switch is located on the left side of the steering wheel.
It can be used when the ignition switch is in the “ON” or “ACC” positions.
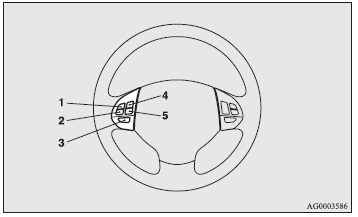
1- Volume up button.
2- Volume down button.
3- Power switch / mode selector button.
4- Seek up / track up / fast-forward button.
5- Seek down / track down / fast-reverse button.
NOTE:
● When operating the steering wheel audio remote control switches, do not operate more than one at the same time.
Turning on the power
Press the power switch (3) to turn on the power. When you turn the power on, the mode that was selected when the power was last turned off appears. To turn off the power, press and hold down the power switch (3) for about 2 seconds until you hear a beep.
Volume adjustment
Volume up button - 1
While the button is pressed, the volume continues to increase.
Volume down button - 2
While the button is pressed, the volume continues to decrease.
Mode selection
Press the mode selector button (3) to select the desired mode.
The mode changes in the following order.
FM1 → FM2 → FM3 → MW → LW → CD → FM1
To listen to the radio
Press the mode selector button (3) to select the desired band (LW/MW/FM).
Automatic tuning
Seek up button - 4/ Seek down button - 5
After pressing these buttons, reception of the selected station will begin.
To listen to a CD
Press the mode selector button (3) and select CD mode.
To fast-forward/reverse the disc
To fast-forward/reverse the disc, press the fast-forward button (4) or the fast-reverse button (5).
Fast-forward
You can fast-forward the disc by holding down the fast-forward button (4). While the button is kept pressed, the disc will be fast-forwarded.
Fast-reverse
You can fast-reverse the disc by holding down the fast-reverse button (5). While the button is kept pressed, the disc will be fast-reversed.
NOTE:
● In the case of an MP3 CD, you can fast-forward and fastreverse tracks in the same folder.
To select a desired track
You can select your desired track by using the track up button (4) or the track down button (5).
NOTE:
● Pressing the track down button (5) once during the song will cause the system to restart playing from the beginning of the song.
READ NEXT:
 Error codes
If an error code (1) appears in the display, take action in accordance with the
table below.
Handling of compact discs
● Use only the type of compact discs that have the mark shown in the illustration
below (playback of CD-R or CDRW discs may cause problems).
● The use of special shaped, damaged compa
Antenna
Roof antenna
To remove
Turn the pole (A) anticlockwise.
To install
Screw the pole (A) clockwise into the base (B) until it is securely retained.
NOTE:
● Be sure to remove the roof antenn
SEE MORE:
Outside rear-view mirrors
To adjust the mirror position
The outside rear-view mirrors can be operated when the ignition switch is in
the “ON” or “ACC” position.
WARNING:
● Do not attempt to adjust the rear-view mirrors while driving. This can be dangerous.
Always adjust the mirrors before driving.
●
DTC P0703, P0705, P0712, P0713, P0715, P0720, P0729, P0731, P0732,
P0733, P0734, P0735, P0736
DTC P0703: Stoplight Switch Malfunction
Stoplight switch system circuit
DESCRIPTIONS OF MONITOR METHODS
Drive the vehicle at 30 km/h (18.6 mph) or more
for 10 seconds, and then turn the ignition switch
to the "LOCK" (OFF) position. In this sequential
operation, no variation has been found in
