
Mitsubishi Outlander: Control Link, Upper Arm and Lower Arm
REMOVAL AND INSTALLATION
CAUTION
- The parts indicated by *1 should be temporarily tightened, and then fully tightened with the vehicle standing on the ground and the curb weight condition.
- The parts indicated by *2 are the bolts/nuts with friction coefficient stabilizer. In removal, ensure there is no damage, clean dust and soiling from the bearing and thread surfaces, and tighten them to the specified torque.
Post-installation operation
- Using your fingers, press the Ball Joint Dust Cover to check for a crack or damage
- Wheel alignment check and adjustment
<2.4L Engine: 5 persons seat>
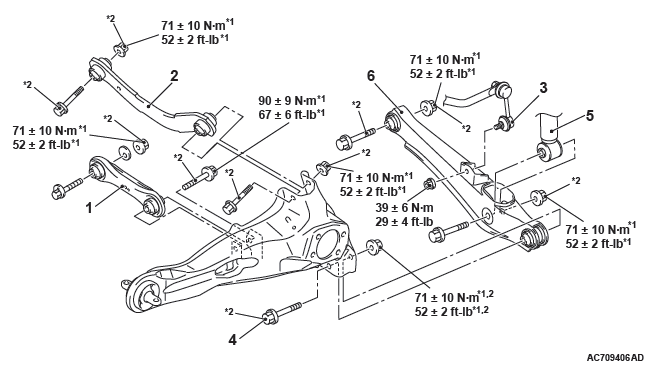
Control link and upper arm removal
- Control link
- Fuel tank vapor hose connection
- Upper arm
Lower arm removal steps
- Stabilizer link connection
- Lower arm and trailing arm connection
- Shock absorber connection
- Rear suspension crossmember stay
- Lower arm
<2.4L Engine: 7 persons seat, 3.0L Engine>
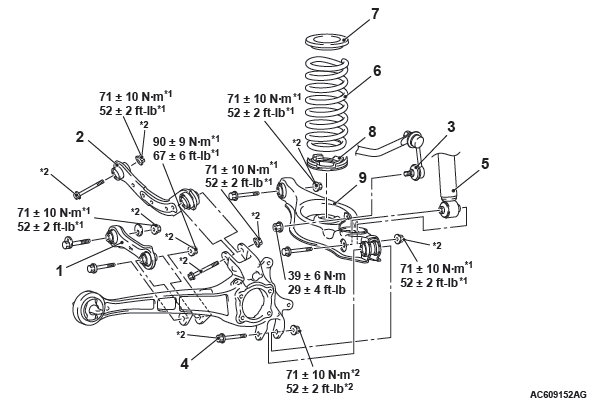
Control link and upper arm removal
- Rear height sensor to control link connection <Vehicles with headlight automatic leveling system>
- Control link
- Upper arm
Lower arm removal steps
- Stabilizer link connection
- Lower arm and trailing arm connection
- Shock absorber connection
- Coil spring
- Coil spring upper pad
- Coil spring lower pad
- Lower arm
REMOVAL SERVICE POINTS
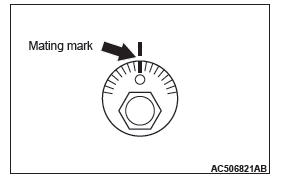
CONTROL LINK REMOVAL
Make a mating mark on the toe adjusting bolt, and remove the control link.
INSTALLATION SERVICE POINTS
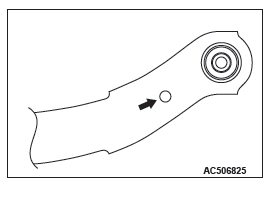
UPPER ARM INSTALLATION
Install the upper arm so that the hole faces the body side.
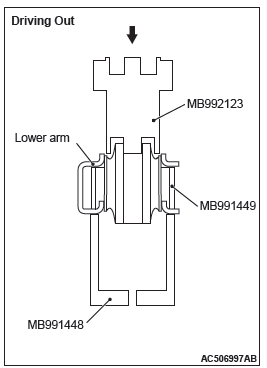
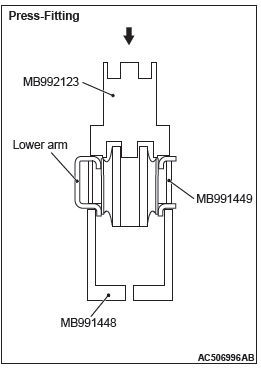
LOWER ARM BUSHING REPLACEMENT
Required Special Tools:
- MB992123: Arm Bushing Remover and Installer
- MB991448: Bushing Remover and Installer Base
- MB991449: Bushing Remover and Installer Supporter
CAUTION As the bushing has different outer diameters at both ends, be careful not to confuse the removal direction with the press-fit direction.
Use the special tools MB992123, MB991448 and MB991449 to remove and press-fit the lower arm bushing.
READ NEXT:
 Trailing Arm Assembly
REMOVAL AND INSTALLATION <2.4L ENGINE: 5 PERSONS SEAT>
CAUTION
The parts indicated by *1 should be temporarily tightened, and then
fully tightened with the vehicle
standing on the ground an
Shock Absorber Assembly
REMOVAL AND INSTALLATION
CAUTION
The parts indicated by *1 should be temporarily tightened, and then
fully tightened with the vehicle
standing on the ground and the curb weight condition.
The p
Stabilizer Bar
REMOVAL AND INSTALLATION
<2.4L Engine: 5 persons seat>
<2.4L Engine: 7 persons seat, 3.0L Engine>
Removal steps
Stabilizer link
Stabilizer bracket
Bushing
Rear differential
SEE MORE:
Cleaning the exterior of your vehicle
If the following is left on your vehicle, it may cause corrosion, discolouration
and stains, wash the vehicle as soon as possible.
● Seawater, road deicing products.
● Soot and dust, iron powder from factories, chemical substance (acids, alkalis,
coal-tar, etc.).
● Droppings
Diagnostic Item 26
DIAGNOSTIC ITEM 26: Short to power supply or ground, open circuit or
line-to-line short in the
CAN-B bus lines.
CAUTION
When servicing a CAN bus line, ground yourself by touching a metal object such
as an unpainted
water pipe. If you fail to do so, a component connected to the CAN bus line may
b
